Garrattfan's Modelrailroading Pages
OO9 NGG16
Chapter 04 Valve gear Installation, Truck 2
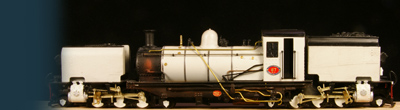
November 22, 2009 I paused the building of the NGG16 for half a year. We were on holiday in the UK were I visited the Welsh Highland Railways and had the opportunity to see the prototype of my NGG16 in reality. I spent an entire day chasing no 87!! I ended up with 700 photos of this loco alone! In July my daughter left the house and in the following months lots of things in the house were rearranged. This resulted in a new hobby room for my own. By October things had been settled and I turned my thoughts to modeling again. I managed to get the valve gear of the first truck running smoothly but it took me almost four months and I really wasn't looking forward to going through all these frustrations again. Next job to be done was the second truck. I evaluated the experiences with the first truck and decided to do some things differently with the second truck.
|
|
These are the names of the parts of the Walschaerts valve gear. Learn more about the Walschaerts valve gear on Steam4me |
|
Problem |
Solution |
| 1. The complete valve gear is difficult to trouble shoot | Build and test the valve gear assy in stages |
| 2. Tolerances are very tight | Cut the cylinder assy and spread the cylinders by 1mm |
| 3. Soldering the valve gear is a fuss | Make a soldering scheme |

Problem 1 The complete valve gear is difficult to trouble shoot
The assembly manual from Backwoods suggests that you assemble the complete valve gear of both sides including attaching it to the bracket before testing and fitting. This has some serious setbacks
So for the second truck I decided to build the valve gear assy in stages, testing it after every assembly stage. First build the bracket. Polish the crosshead slide bar to ensure a smooth sliding surface. Form than on the order of working is:
During all operations until 11. the cylinder is NOT fixed in place, making it much easier to install the so far completed valve gear assy.
|
|

The second truck in stage 4: testing with the right crosshead and connecting rod on |
|
2. Tolerances are very tightWell, during my quest for a solution during the assembly of the first truck I was advised to cut the cylinder assy in two and spread the two cylinders by 1 mm. On the first truck I opted not to do that. The kit designers had made the kit accurately and it should possible to avoid this option. After a lot of fiddling I managed to get it working without spreading the cylinders. On the second truck however I decided it was an easy and fast solution. |
|
The cylinder assy of the second truck, split, spread and resoldered. I forgot that the front running bissel should have enough clearance. So if you do this trick make sure the soldered on brass sheet does NOT extend all the way down but stays say 2 mm clear from the bottom edge.
|
|

The two different cilinder assies. At first glance the differences is hardly noticeable. And guess what: the second truck ran without any further tinkering!! I achieved in less than one week what took me twelve weeks on the first truck, lead time that is, in real working hours the difference is even more dramatic. |
|

Well, the difference is visible ... but I wonder if anyone will notice after painting. The cylinder assy of the second truck is a little off center, I will correct that later. |
|

The first truck, cylinders positioned normally |
The second cylinder spread a little, could you tell the difference if you hadn't known it?? |
3. Soldering the valve gear is a fussFirst I will describe the soldering of the valve gear in more detail than I did when documenting the building of the first truck. Second I will draw up a soldering scheme lining out which joints are soldered at which temperature |
|
3.1 Soldering in more detailThe idea of soldering the valve gear came from Iain Rice's book on "Locomotive Kit Chassis Construction". Soldering the valve gear needs some getting used to, but it has distinct advantages

When I say "flush" I mean really, really "flush". You may consider riveting, it is after all your model. But if you choose to rivet the valve gear because you are afraid of soldering you should consider giving up building this loco altogether. You will find that in the end you must solder the main drive rods, the connecting rods and the return cranks anyhow. Nothing to be riveted there and gluing is not a very reliable option. But how can you solder one part of the joint and at the same keep the other part free of any solder so as allow it to rotate freely? Iain Rice suggests paper as a separator of the moving and the soldered part of the joint. At first this didn't work for me, I soldered my first joint rock solid. I came up with the idea of using some grease to stop the flux and solder from flowing to the wrong side of the joint. |
|

First a rivet is put in place. Next the moving rod is added. Remember that you work upside down, so think "the other way around". If you build both valve gears at the same time also remember to mirror the joints. |

The rod is then brushed with some kind of grease. I use vaseline for it. Let the grease enter the seam between rivet and rod to block it. Avoid smearing on the upper part of the rivet. |

A pre-drilled paper shim is moved over the rivet. Pre-drilling is necessary because trying to punch the rivet through the paper will probably send it sprawling, making you crawl all over the place to retrieve it. Pre-drill somewhat undersize so the paper sits tight around the rivet. I used the paper of sticky notes which was thick enough. |

Again this paper is brushed with grease. Take care NOT to grease the rivet. The greased paper prevents flux and solder to trickle down and make the whole thing solid. |
Now place the rod that is to be soldered to the rivet |

Apply as little flux as you can. Have your soldering iron at hand you must now move fast. |

Solder with the appropriate kind of solder. Do it fast, do not linger with the iron, take the iron away as soon as the solder flow otherwise chances are that will you scorch the paper and then the solder will pass. I apologise for the sorry state the soldering tip is in. It needs replacement. |

Check if everything sits well and if the moving joint does just that: move. |

It does!! |

If so, carefully peel the paper shim away It will leave a nice little play between the two rods. Cut the protruding rivet backside flush and file it down if necessary |
3.2 A soldering schemeSoldering the valve gear involves solder of various melting points mostly 180 and 140 degrees. I didn't make the valve gear of the first truck in one day. Over time I tended to forget which solder I used where so I messed up here and there. For the second truck I wanted a good plan 1) to remember where I used which solder and 2) to avoid low melt solder (70 degrees) of possible. I figured out a solder scheme and achieved both targets
Notice that there are no adjacent joints needing the same solder. |
|

First all 180 degree joints are soldered and than the 140 joints. At this stage testing of the left and right connecting rods with crossheads can begin (see Problem 1) |
|

Completed. I had been testing the left and right connecting rods with crossheads thoroughly until they moved freely. So I dared to solder all the 140 degree joints in one go and offered the complete assembly to the frame and cylinders. It ran without a flaw!! The return cranks are "folded" up on the bracket to stay out of harms way while testing |
|


Finishing the valve gearWell some work remains to be done after the state of affairs on the previous photo. The connecting rod should be positioned by soldering its bush on the crank pin and the return crank should be soldered to the crank pin. Although technically feasible, both joints use the same temperature of solder (140 degrees), it is possible to solder these two joint in one go. Don't, I repeat, don't be tempted to do that. If you do two things at a time you won't know which of the two is the cause of trouble if binding occurs. The golden rule of valve gear assembly: Introduce only one source of trouble at any one time Guess how I found out about this rule...... Another wisdom of experience: Three things are important: testing, testing and testing The truck should run freely under its own weight. If it does not and binds, do not press on it to force it to run. The small motor will tell later if you did!! End of sermon. Offering up the valve gear assembly to the cylinders is a very fiddly move because you have six brass rods to fit in the cylinders and you have to move the bracket to its designated place all at the same time. You need four hands to do this. I used a simple trick to eliminate the need for one hand so you will need only three. The latter is a fairly common situation for any modeler to cope with. By securing the frame to a strip of wood, which is clamped in a vise, you have this direly needed extra hand .
Now fitting the valve gear assembly is not so impossible anymore. Good, having said that, it is important to realize that you will probably have one final difficulty to surmount before finishing.
|
||||||||||||||||||||||||||||


Sign my
GuestBook